
|
18sound 18” Dual Subwoofer build |
Post Reply 
|
Page <1234 5> |
| Author | |
AndyWave 
Registered User 

Joined: 30 March 2008 Location: Finland Status: Offline Points: 380 |
 Post Options Post Options
") Thanks(0) Thanks(0)
 Quote Reply Quote Reply
 Posted: 13 September 2018 at 11:42am Posted: 13 September 2018 at 11:42am |
|
Hi Slight OT at first - Violin/cello makers map the resonances with rice grains. They put violin body pieces above a speaker cone, some 5cm away, and watch the grains making a pattern. I once made a 10-100 Hz 10" closed box and suitable analogue oscillator to a violin luthier as tuning tool. Of course the maximum spl is not the point here. Back to the point; I've done resonance mapping just like Ceharden says, on unbraced empty cabinet prototype but with rice grain or just feeling un-braced cabinet sides with my fingers and marking resonance nodes with a pencil. Almost every time node points form a pattern, just draw straight lines with ruler through these points and there are your required bracing lines visible. Therefore its handy to have one side of the prototype cabinet attached by screws and sealed with window weather stripping. Usually I use 10-500Hz continuous sweep signal at first, naturally at sensible SPL level. Watch out the driver excursion! After bracing cabinet, apply recommended or calculated processing and repeat approaching nominal RMS power.
Edited by AndyWave - 13 September 2018 at 11:43am |
|
|
torturing electrons since ......
|
|
 |
|
|
snowflake
Old Croc 
Joined: 29 December 2004 Location: Bristol Status: Offline Points: 3122 |
Post Options
Thanks(0)
Quote Reply
Posted: 13 September 2018 at 1:20pm |
|
+1 brace the front to the back. and your corner braces are just a waste of air and wood.
|
|
|
|
|
wilidapili
Registered User
Joined: 13 August 2018 Location: Finland Status: Offline Points: 56 |
Post Options
Thanks(0)
Quote Reply
Posted: 14 September 2018 at 9:53am |
|
Thanks for all the feedback. I removed the corner braces and went and copied the shape of the braces Helge Bentsen had done at soundforums.net, since it is tried and tested. The brace is now combined with the port divider and now all of the panels are tied to each other, and the whole brace will sit in a 7mm deep groove.
 Edited by wilidapili - 14 September 2018 at 9:54am |
|
|
|
|
bass*en*mass
Old Croc

Joined: 03 September 2009 Location: "unknown" Status: Offline Points: 4009 |
Post Options
Thanks(0)
Quote Reply
Posted: 14 September 2018 at 10:11pm |
|
looks much better now.. maybe join the back to the baffle by extending the middle braces aswell and you should get as nice solid cab..! |
|
|
|
|
wilidapili
Registered User
Joined: 13 August 2018 Location: Finland Status: Offline Points: 56 |
Post Options
Thanks(0)
Quote Reply
Posted: 14 September 2018 at 10:44pm |
Do you mean the braces that are on either side of the baffle that aren’t touching the baffle? I extended them to touch the baffle after posting this, but I’m not sure if the drivers will fit to mount when done this way. Otherwise the back is joined with the baffle via the port divider, which is also sitting in a groove within the baffle.
|
|
|
|
|
boots-hifi
Old Croc

Joined: 15 August 2011 Status: Offline Points: 2463 |
Post Options
Thanks(0)
Quote Reply
Posted: 14 September 2018 at 11:35pm |
|
Ive been looking at this design for some time. Ill be interested to see the outcome. I know someone on the prosound web forum built a pair, he was very complimentary of the design. Bracing however did concern me, what ever the solution built properly this design should rock.
|
|
|
|
|
AndyWave
Registered User
Joined: 30 March 2008 Location: Finland Status: Offline Points: 380 |
Post Options
Thanks(0)
Quote Reply
Posted: 19 September 2018 at 12:57pm |
|
Mr Wili, just sent you some e-mail.
|
|
|
torturing electrons since ......
|
|
|
|
|
wilidapili
Registered User
Joined: 13 August 2018 Location: Finland Status: Offline Points: 56 |
Post Options
Thanks(0)
Quote Reply
Posted: 19 September 2018 at 2:12pm |
Right back at ya! On another note: Building has begun. I will post some photos maybe later today or tomorrow when all of the panels have been cut!
Edited by wilidapili - 19 September 2018 at 2:12pm |
|
|
|
|
wilidapili
Registered User
Joined: 13 August 2018 Location: Finland Status: Offline Points: 56 |
Post Options
Thanks(0)
Quote Reply
Posted: 26 September 2018 at 8:04pm |
|
Here's some photos I've snapped during the process. 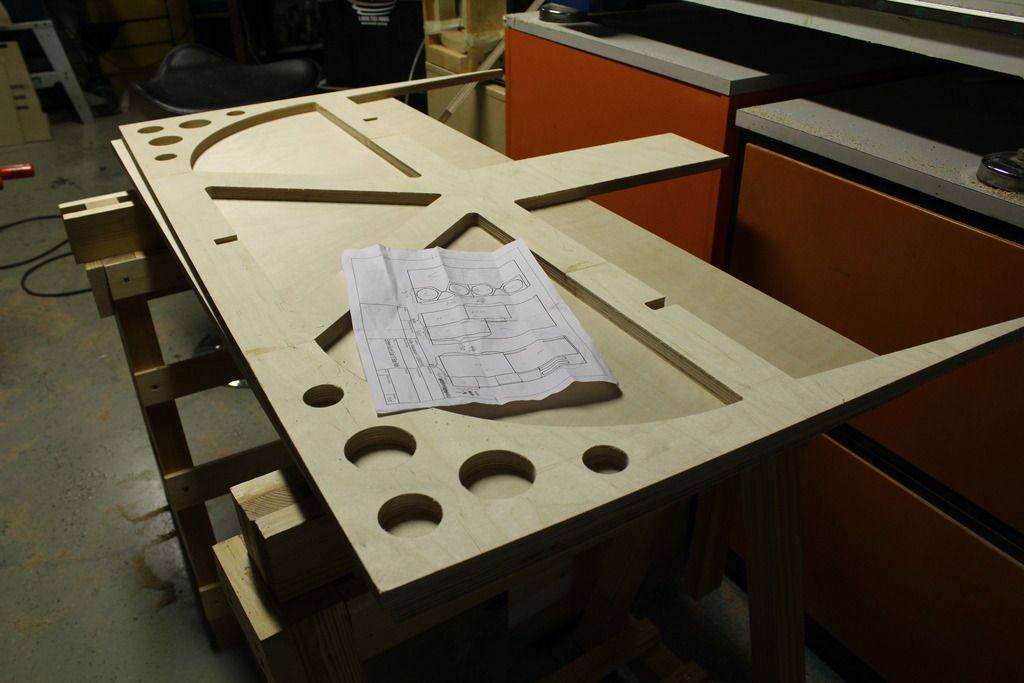 Bracing structure cut on the CNC in three pieces and glued together with half-lap joints. And my cut list. 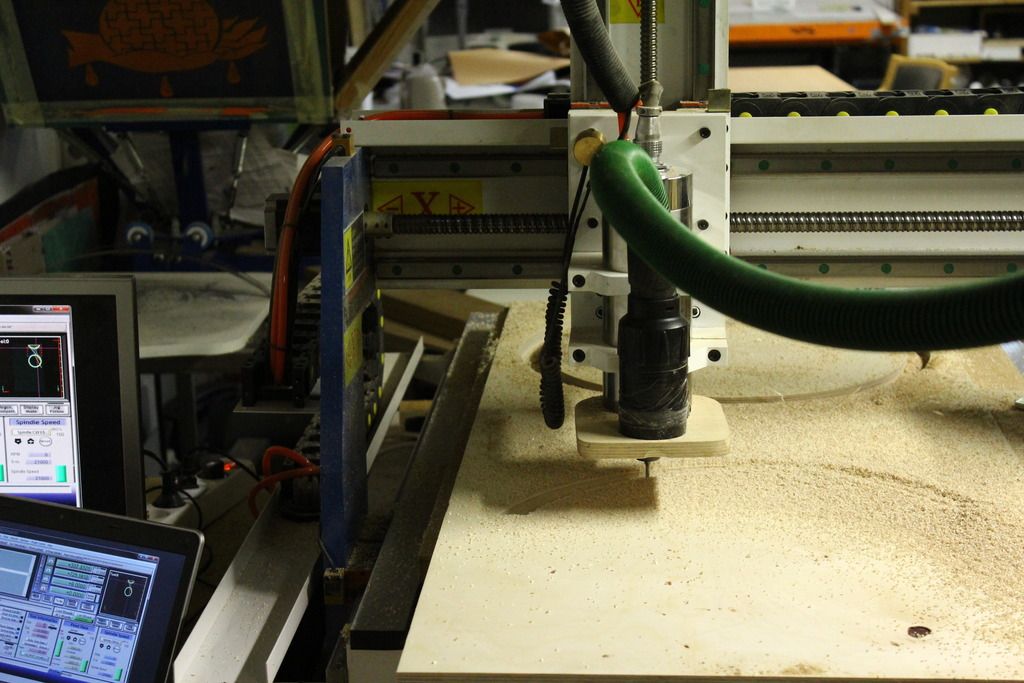 Milling the baffle. The CNC is 600 x 900 mm, so I couldn't mill the whole thing. 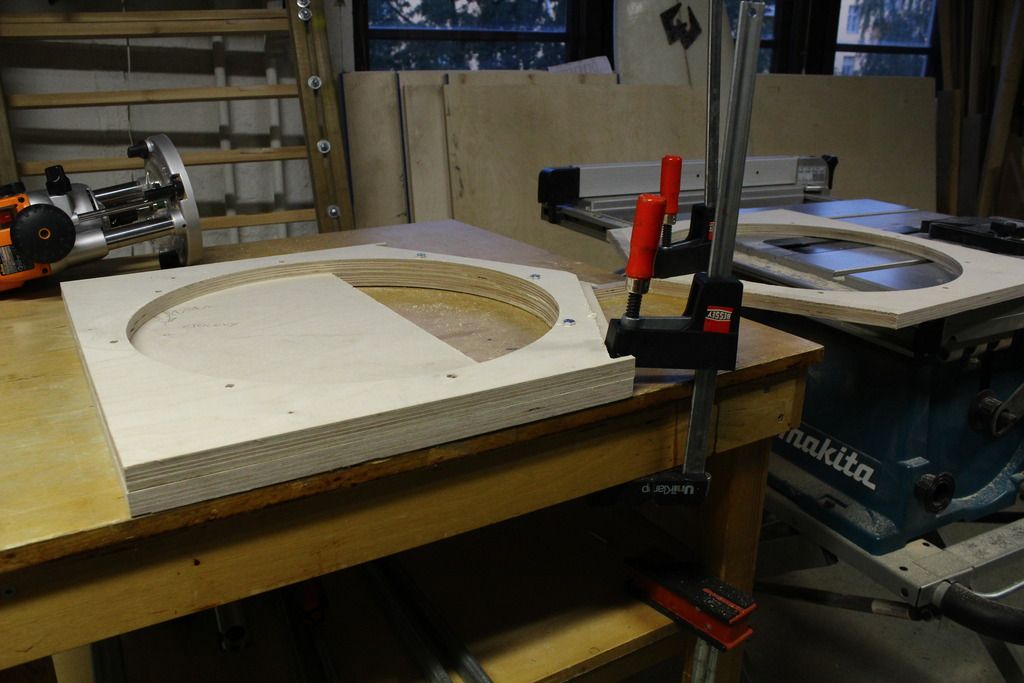 So I decided to cut part of the second opening and make a jig that attaches to the mounting screws so that I can use a router with a flush trim bit (actually, I used a scroll saw to remove most of the material before using the router). 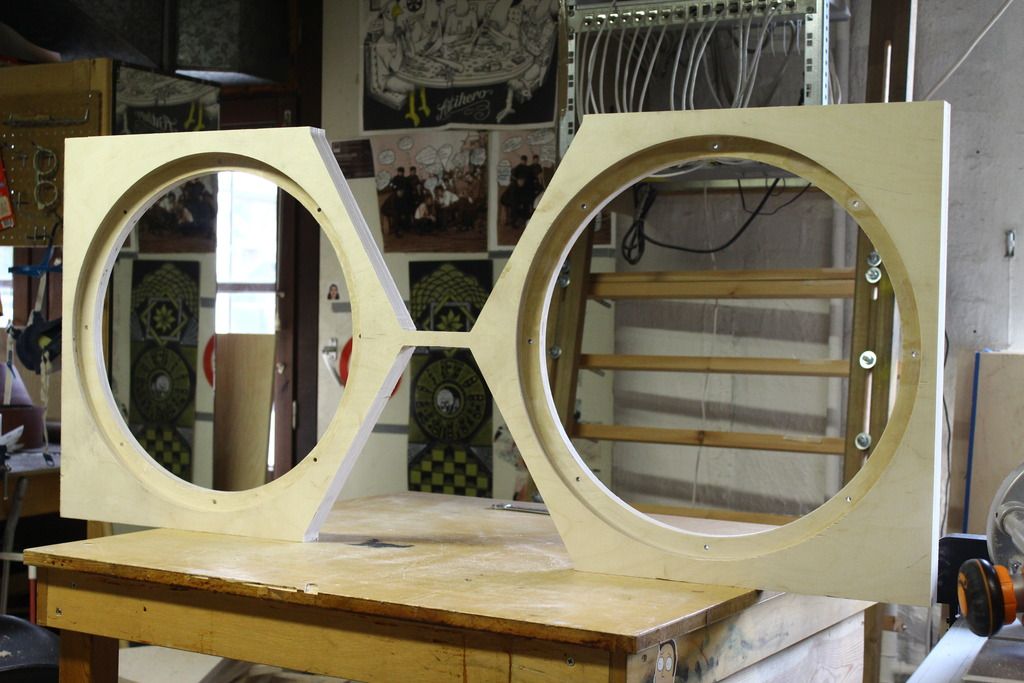 Voilá! 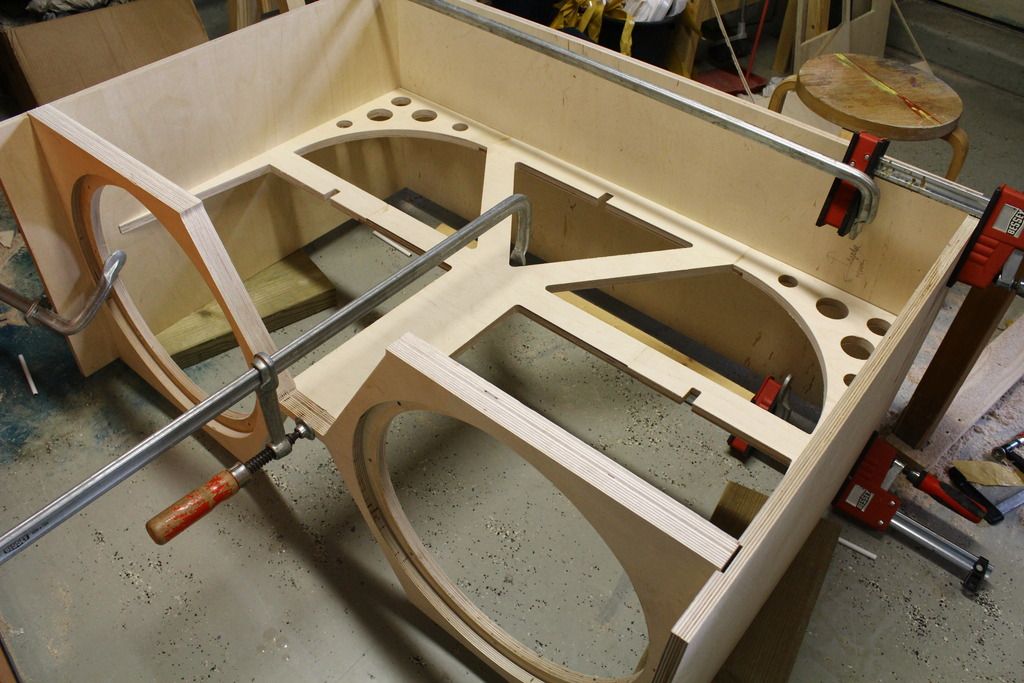 Dry-fitting everything before screws. The bracing sits in a 7mm deep groove all around, and the baffle sits in a 7mm deep groove on every side as well. 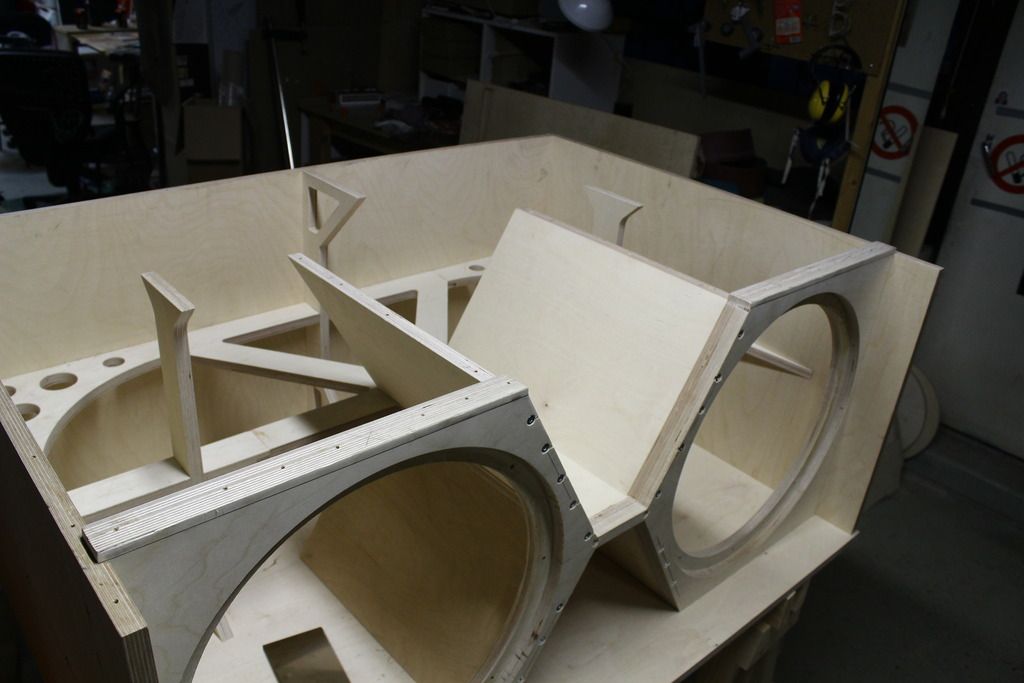 A lot of screws, I know... But I want(ed) everything to sit as flush as possible, so I don't need to fill a lot of potential gaps. 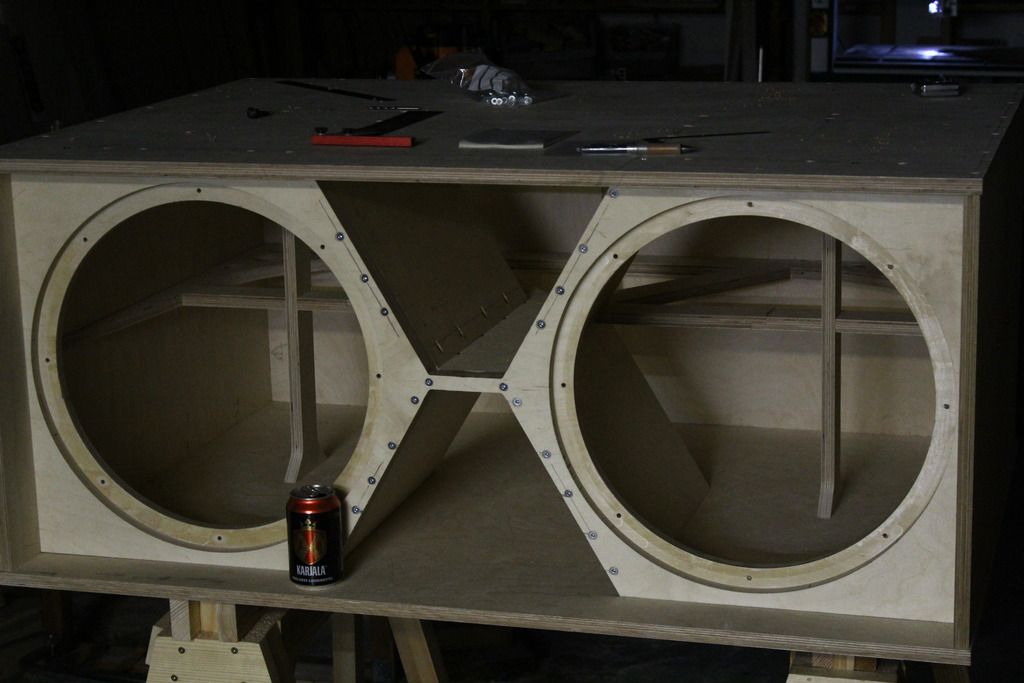 Here's how it looks now. Everything is screwed in place from outside to inside. Still need to route the holes for handles and Speakon. After that, I will take it apart, sand, and put everything except the top back together with glue and hide the screws with some woodfiller. Then I will use some silicone (or something else?) around the inside seams to make sure there is no leaks. Would you recommend to put silicone, glue, or something else in the screw holes with the screws?
Edited by wilidapili - 26 September 2018 at 8:09pm |
|
|
|
|
MarjanM
Old Croc

Joined: 10 February 2005 Location: Macedonia Status: Offline Points: 7816 |
Post Options
Thanks(0)
Quote Reply
Posted: 26 September 2018 at 11:41pm |
|
Very good job!
|
|
|
Marjan Milosevic
MM-Acoustics www.mm-acoustics.com https://www.facebook.com/pages/MM-Acoustics/608901282527713 |
|
|
|
|
valve head777
Old Croc
Joined: 27 July 2012 Location: East Sussex Status: Offline Points: 1781 |
Post Options
Thanks(0)
Quote Reply
Posted: 27 September 2018 at 12:03am |
|
Liking that

|
|
|
Freedom of choice, choice of freedom.
|
|
|
|
|
smitske96
Young Croc 
Joined: 16 February 2016 Location: The Netherlands Status: Offline Points: 1092 |
Post Options
Thanks(0)
Quote Reply
Posted: 27 September 2018 at 7:43am |
|
Nice job!
|
|
|
|
|
Post Reply
|
Page <1234 5> |
| Tweet |
| Forum Jump | Forum Permissions You cannot post new topics in this forum You cannot reply to topics in this forum You cannot delete your posts in this forum You cannot edit your posts in this forum You cannot create polls in this forum You cannot vote in polls in this forum |


 Topic Options
 bass*en*mass wrote: