
|
Boominator MINI (development thread) |
Post Reply 
|
Page <1 6364656667 102> |
| Author | |
Aterren 
Registered User 
Joined: 14 July 2013 Status: Offline Points: 151 |
 Post Options Post Options
") Thanks(0) Thanks(0)
 Quote Reply Quote Reply
 Posted: 14 November 2014 at 1:57pm Posted: 14 November 2014 at 1:57pm |
Thank you. I'm quite happy with how the finish turned out. There are still some rooms for improvement. It is now in my office, and people at work have taken a close look at it and think that it was purchased. They cannot believe I made it myself. Oddly, they seem particularly impressed by Bluetooth. A lot of the credit goes to Saturnus who made some great decisions on the aesthetics of this design. On the NS6 any the baffle is 9 mm thick. Going to 12 mm on the mini has much better proportions. Edited by Aterren - 14 November 2014 at 1:59pm |
|
 |
|
|
Tsyphon
New Member 

Joined: 06 November 2014 Location: Dallas, Texas Status: Offline Points: 8 |
Post Options
Thanks(0)
Quote Reply
Posted: 15 November 2014 at 8:35am |
|
In that regard will two 6mm panels laminated together show up in the roundover to any noticeable degree? I have worked out that with a 2x4 I will have enough wood for the whole thing with a bit left over and some work-room for the extra dado mm's. If I were to do 2 panels in 12mm that would mean i would really only need 1x4 of 6mm and 1x4 of the 12mm, which I'm pretty sure they don't do.
If there is no noticeable seam in the laminate area..to laminate all I have to do is glue the 2 pieces together and then put it on say, flat cement in my garage and then weight it down to dry right? The only steps I'm unsure if I will be able to do easily are the roundover and possible the chamfer, although the roundover seems like it would be the most difficult part. |
|
|
|
|
Saturnus
Old Croc 
Joined: 13 July 2010 Location: Copenhagen Status: Offline Points: 2025 |
Post Options
Thanks(0)
Quote Reply
Posted: 15 November 2014 at 9:40am |
|
There will be a noticeable seam where the outer layers meet for two reasons. One, they are usually thinner than the inner layers as ply wood is manufactured to be slightly too thick and then the outer layers are sanded to get the final thickness as well as a nice surface. And two, if you just cut up two identical pieces next to each other the direction of grain will be the same. Since ply wood is made by alternating direction of grain perpendicularly then two ply with the same direction of grain will look like one much thicker ply.
If ordered specifically from the factory you can get plywood where the outer grain on one side is exactly the half the thickness of the average of the inner plies. This is specifically for end-over-end laminating. Mind you, the manufacturer will usually ask for a minimum of 12-20 pallets delivered (or whatever fits a fully stacked 44 feet lorry flatbed load).
Edited by Saturnus - 15 November 2014 at 9:49am |
|
|
|
|
TIP220
Registered User

Joined: 02 February 2013 Location: Kent Status: Offline Points: 45 |
Post Options
Thanks(0)
Quote Reply
Posted: 15 November 2014 at 10:59am |
|
I am lucky that I have access to a small CNC router at work but as the technology gets more widespread there has been an explosion of companies offering CNC services.
for example http://www.cncworkshop.co.uk/cnc-cutting-cost.php it is quite possible to export .dxf and .dwg files from sketchup. This relatively cheap solution would allow the baffles to be routed from a single 12mm board (with dado's , extra holes, chamfered/radius's all in place) essentially the parts would be delivered ready to stick together. Flat pack boominator :) that said even though I have the construction side worked out , I'm still scratching my head with power options. I would like to go LiFepo4 on my next build but sourcing the right parts and how they should be wired up still makes my head hurt. I have a RC pack I would like to use (4200 zippy) , I also have an accusafe, a Imax balance charger and a simple lifepo4 charger. I'm hoping I can combine them to make a safe power system but I am very nervous of potentially building something dangerous through lack of knowledge. will these parts do or do I need something else? edit - having dug about in my parts box I also found this would this work as a charging solution for the zippy max ? after much reading on here and diy audio there are endless discussions on power systems but no detailed guides of what others have done. links and idiot proof instructions desperately needed . Edited by TIP220 - 15 November 2014 at 2:54pm |
|
|
|
|
lutkeveld
Young Croc 

Joined: 23 September 2013 Location: The Netherlands Status: Offline Points: 517 |
Post Options
Thanks(0)
Quote Reply
Posted: 15 November 2014 at 11:23am |
|
Or get it lasercut at a local fablab :) It is quite easy to make the .dxf or .svg files with inkscape, I think the Mini will fit on 3 sheets (6 euro/sheet).
@tsyphon. The seems on the stacked baffle aren't noticable on my Micro. Even if you know that it's double 6mm, you can't see it.
|
|
|
|
|
Aterren
Registered User
Joined: 14 July 2013 Status: Offline Points: 151 |
Post Options
Thanks(0)
Quote Reply
Posted: 15 November 2014 at 5:18pm |
I feel your pain. A good argument can be made that Li based battery packs are not suited to plug and play DIY. Thus far I have not found any real turn key solutions that tick all the boxes (small, cost effective, integrated cell balancing and CC/CV charger, and finally mains and DC power input). The easy answer is a lead acid. They are cost effective and inexpensive charging solutions are readily available At the other extreme is the OpenUPS from Mini-Box: http://www.mini-box.com/OpenUPS Other alternatives: - Call battery space and have them provide a solution : Roll your own: Protection modules: http://www.batteryspace.com/pcmforlifepo4batterypacks.aspx Chargers: An inexpensive LiPo: http://www.ebay.com/itm/B3-AC-110V-240V-input-LED-Display-2S-3S-7-4V-11-1V-Lipo-Battery-Balancer-Charger-/310883691105 Note that a lot of the protection boards mention charging but do not have integrated charge controllers. They rely on external chargers to implement the CC/CV charge algorithm. I'm sure others will expand on the points above. |
|
|
|
|
lutkeveld
Young Croc
Joined: 23 September 2013 Location: The Netherlands Status: Offline Points: 517 |
Post Options
Thanks(0)
Quote Reply
Posted: 15 November 2014 at 5:36pm |
|
4S LiFePO4 with 26650 cells is the recommended way to go for the Mini/Micro.
A123 has some of the highest quality cells on the market, but those are limited to 2.3Ah (old) and 2.5Ah (new). There are some good, but not as good as A123, cells out there that pack 3.3Ah. Connect the pack to a PCM/BMS that handles over(dis)charge, balancing and short circuit. Connect the PCM/BMS to a LiFePO4 charger. Some cells can charge at 1C, which means you can go from empty to full in about an hour (!). Make sure people can't reverse the polarity of the charger, use a 5.5x2.1 DC plug for example. Depending on local prices it will cost around 65 dollar in total (cells, pcm/bms, charger).
|
|
|
|
|
TIP220
Registered User
Joined: 02 February 2013 Location: Kent Status: Offline Points: 45 |
Post Options
Thanks(0)
Quote Reply
Posted: 15 November 2014 at 6:51pm |
thanks for the reply, any suggestions for reliable retailers (that will ship to the UK) I ordered some 26650 cells via alibaba months ago, seems they are still being held at the airport in maylasia. batteryspace seems excellent but was hoping for a seller this side of the pond can you look at the PCM/BMS I linked too (here) and confirm its suitability ?? I have that one in the shed thanks for your help
Edited by TIP220 - 15 November 2014 at 6:55pm |
|
|
|
|
WesleyK
Registered User

Joined: 24 December 2012 Status: Offline Points: 90 |
Post Options
Thanks(0)
Quote Reply
Posted: 15 November 2014 at 9:46pm |
|
I have a bunch of these:
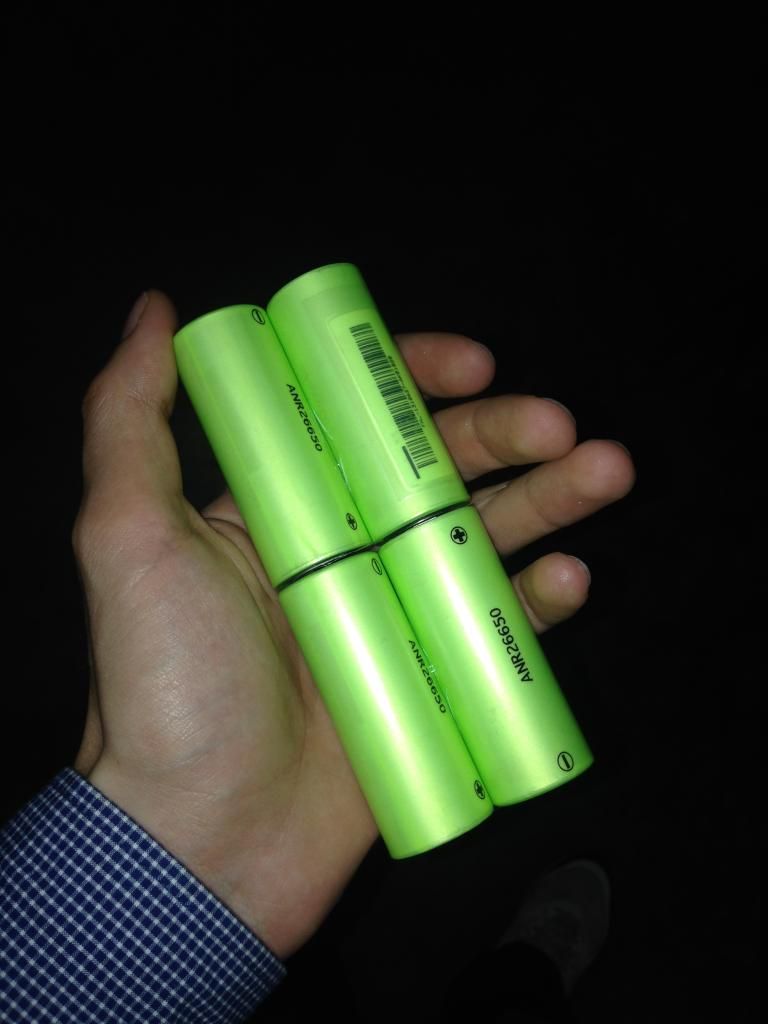 And I should also be able to get separate 26650 A123 cells through my local battery supplier, the only problem Is that I'm not sure if I'm able to ship these to the UK from The Netherlands. Also made some progress on my mini: 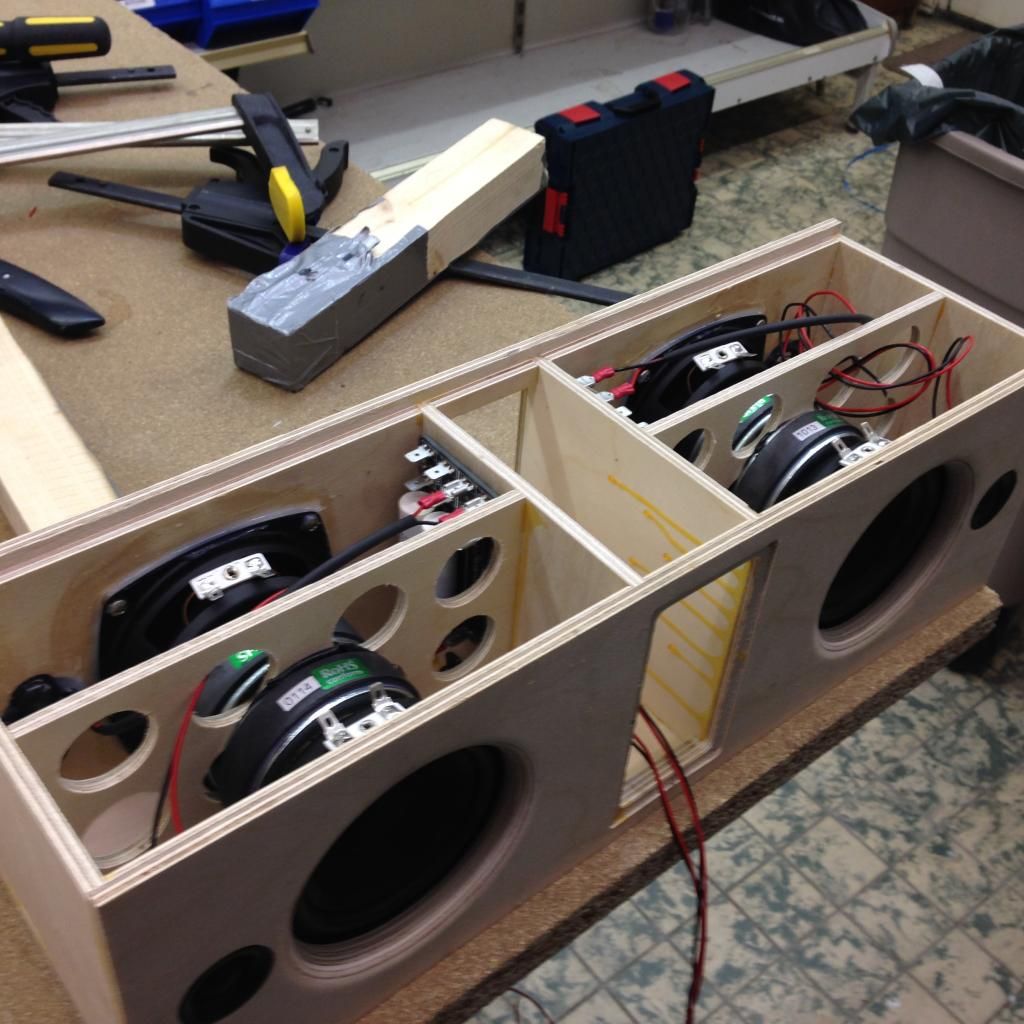 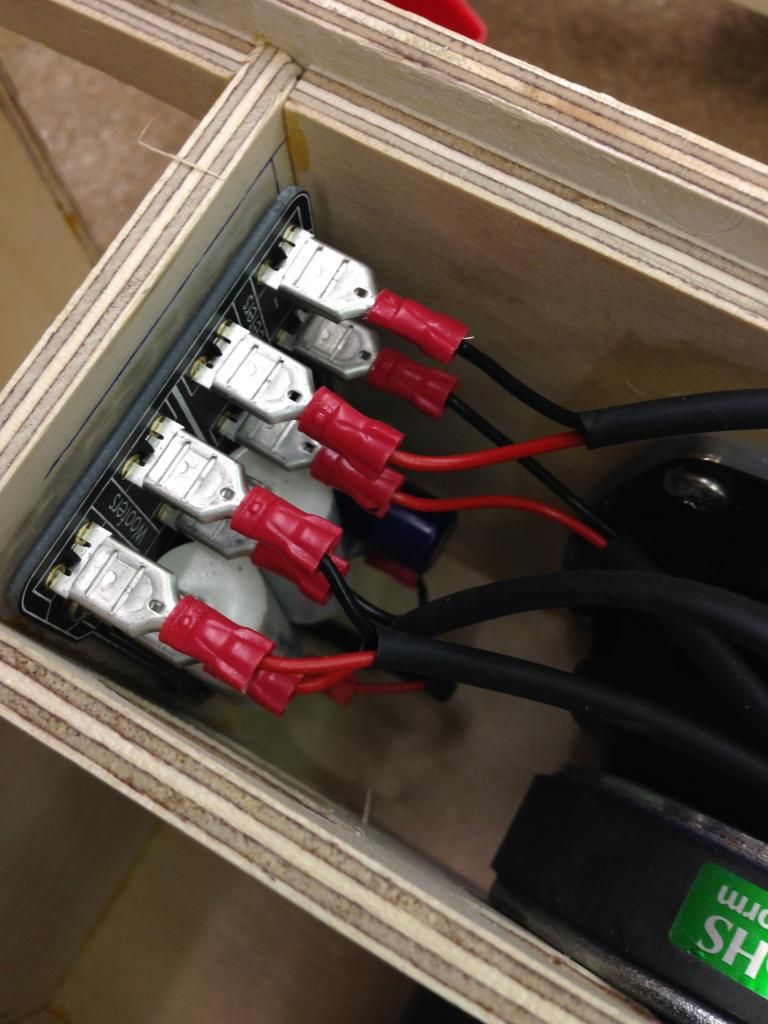 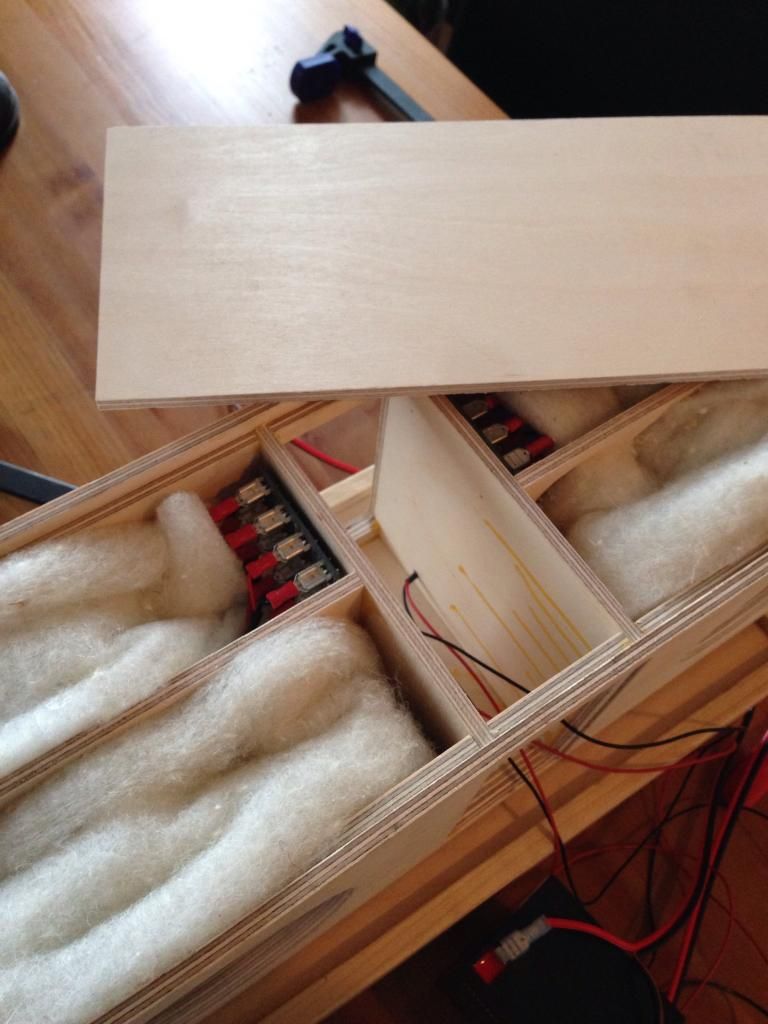 Testing :) : 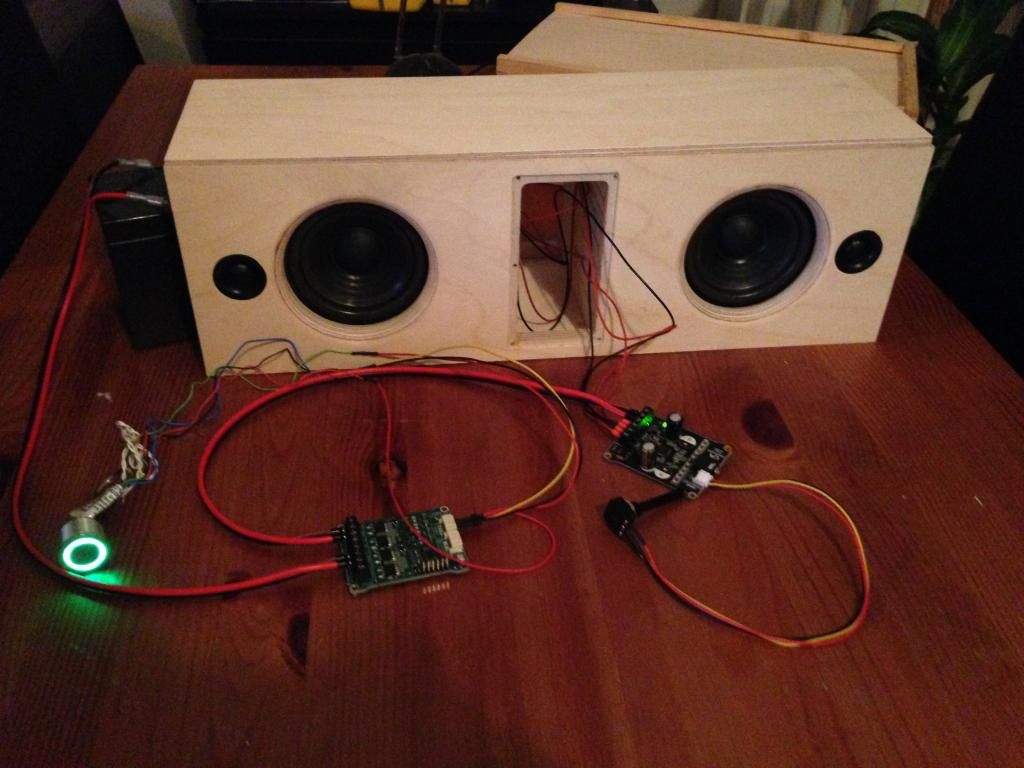
|
|
|
|
|
Saturnus
Old Croc
Joined: 13 July 2010 Location: Copenhagen Status: Offline Points: 2025 |
Post Options
Thanks(0)
Quote Reply
Posted: 15 November 2014 at 9:52pm |
|
A version 2 of the Accusafe teaser I see

And a PCB version of the MINI filter. Edited by Saturnus - 15 November 2014 at 9:55pm |
|
|
|
|
WesleyK
Registered User
Joined: 24 December 2012 Status: Offline Points: 90 |
Post Options
Thanks(0)
Quote Reply
Posted: 15 November 2014 at 9:55pm |
|
Thats right :D . Will take some time before its ready though, but the hardware seems to be working as planned.
Yep received the filter boards a while ago, works quite well :). 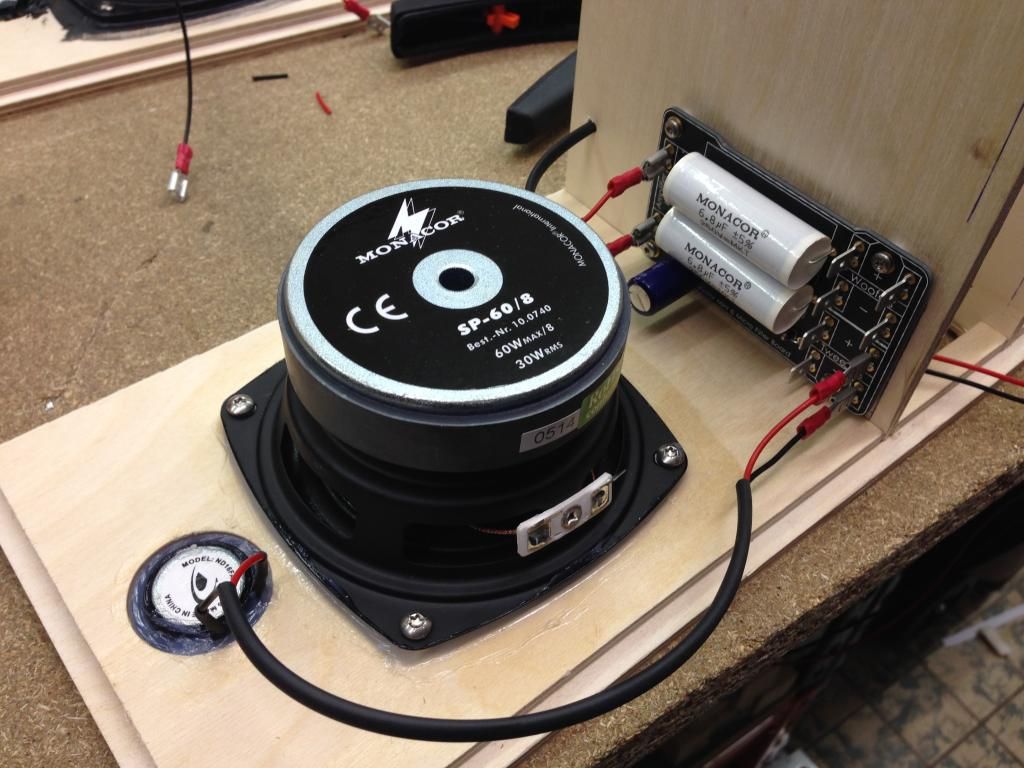 Edited by WesleyK - 15 November 2014 at 9:57pm |
|
|
|
|
lutkeveld
Young Croc
Joined: 23 September 2013 Location: The Netherlands Status: Offline Points: 517 |
Post Options
Thanks(0)
Quote Reply
Posted: 16 November 2014 at 2:19am |
|
Why are there two extra holes in the center brace? Mistake?
|
|
|
|
|
Post Reply
|
Page <1 6364656667 102> |
| Tweet |
| Forum Jump | Forum Permissions You cannot post new topics in this forum You cannot reply to topics in this forum You cannot delete your posts in this forum You cannot edit your posts in this forum You cannot create polls in this forum You cannot vote in polls in this forum |


")


 Topic Options
 Tsyphon wrote: